Sunday 25 August 2019

Road Home to Manitoulin

Back in 2016, I participated in a row along, sponsored by Marian Pena of Seams to be Sew.  The theme was 'Road to Home' and I thought I would really enjoy this event.  I did!  My idea was to create a 'filmstrip' wall hanging showing important sights that I enjoy while driving to my home on Manitoulin Island.
At the time, I placed all the files on Craftsy, but you all know that most of these files are not available to people any longer.  Marian suggested that we all do a recap and bring our row along and files back up on our own sites or blogs.  She will host a gallery of all the Row Alongs that she has run and I think this will be a great gallery to peruse - and maybe even to prompt us to make new projects!!
I still am not happy with the rocks I did for Block 1.  I redid them, but they still don't look right.  I'm going to do some thread painting and try to fix the block.  Frankly the whole quilt could probably use some thread painting!
Thanks for visiting and looking at my row and thanks Marian for this prompt!
Here is a link to a pdf file for the project:    Road Home to Manitoulin

All the pages of directions and templates were created with the format of 8.5" x 11" paper.

If you like the filmstrip idea, here is a sheet with the instructions for how I made the strips:
I'll show each block and the template pages and then I'll put in the 18 pages of explanations for the whole row.

Block 1:


Block 2:


Block 3:


Block 4:


Block 5:


And here are the files with the explanations and images to make the whole row!


Friday 25 January 2019

Jelly Rolls into Half Square Triangle (HST) units


I have 2 unfinished quilt tops that I began a few years ago – well, I bought some of the Moda fabric line designed by Sandy Gervais called ‘Merry and Bright’…oops!  Just checked on the web and it was 2008!  Oh well, these things happen!  Anyway, I loved it so much, I bought one of the panels, a jelly roll and a couple of the charm packs, as well as 3 yards of the only yardage they had left – the blue crisscross fabric.    Why did they become UFOs?  For me, as a quilt designer, quilts become UFOs when I have a design decision and can’t make a clear one – so the fabric goes into a box and waits until the answer bubbles up!
Can you see what I mean by deciding?  What would you put in the middle of this panel?  My first decision was that I wanted the quilt to be the same if it was turned around, top to bottom.  So I kept running images through my mind:  4 wreaths around the middle, Christmas gifts, more Christmas balls, trees all around….. many ideas.  But last year, some patterns showing Christmas trees made of paisley shapes appeared on the internet and I decided to appliqué 2 trees on the centre panel.  I went down to my daughter’s place last June to stay with my grandson while she and her husband went on a holiday – only because he didn’t have his full driving license yet and he had several events planned.  So we had a good time during the day – he played his game on the Internet in the rec room and I made paisley shapes in the dining room and sewed them on.

I had already attached the flying geese border and the friendship star border, so I just had to decide what to put on for the last border to make the quilt larger. I absolutely love using Electric Quilt (EQ8) to create quilts - as you can see from the variety of borders I auditioned!!


I had most of one jelly roll left and decided that I needed to repeat the white fabric that I used in the flying geese fabric.  Then one of the members of my quilt club needed someone to give a lesson in yet another way to make half-square triangle units.  I had a reference sheet for making them out of jelly strips (2½″ wide), so I volunteered to show this method.  You end up with 3″ unfinished HSTs and very little waste!   Here’s a good tutorial about this:  http://www.quiltineering.com/hst-tutorial-strip-tube-method/  I hadn’t see this one, but it is almost what I did.  The two little additions were:
1.    I sewed a scant 1/4 “ seam (so that I could use the cutting method like she calls #1, and
2.    After sewing one side of the tube, I starched and pressed, because in the end, you will have bias edges, so I wanted them to stay straight.

At the top, ruler is set for next cut.  Bottom is square that was not trimmed!

All in all, if you have jelly roll strips, this is definitely the most efficient way to make hundreds of half square triangle units (HST)!
Here's an image of what the border will look like when sewn:

 I think it looks like a 'modern' quilt style (although the rest of the quilt isn't).  What do you think?
Thank you for reading this!


Tuesday 18 December 2018

Stockings and Zippered Pouches for Christmas


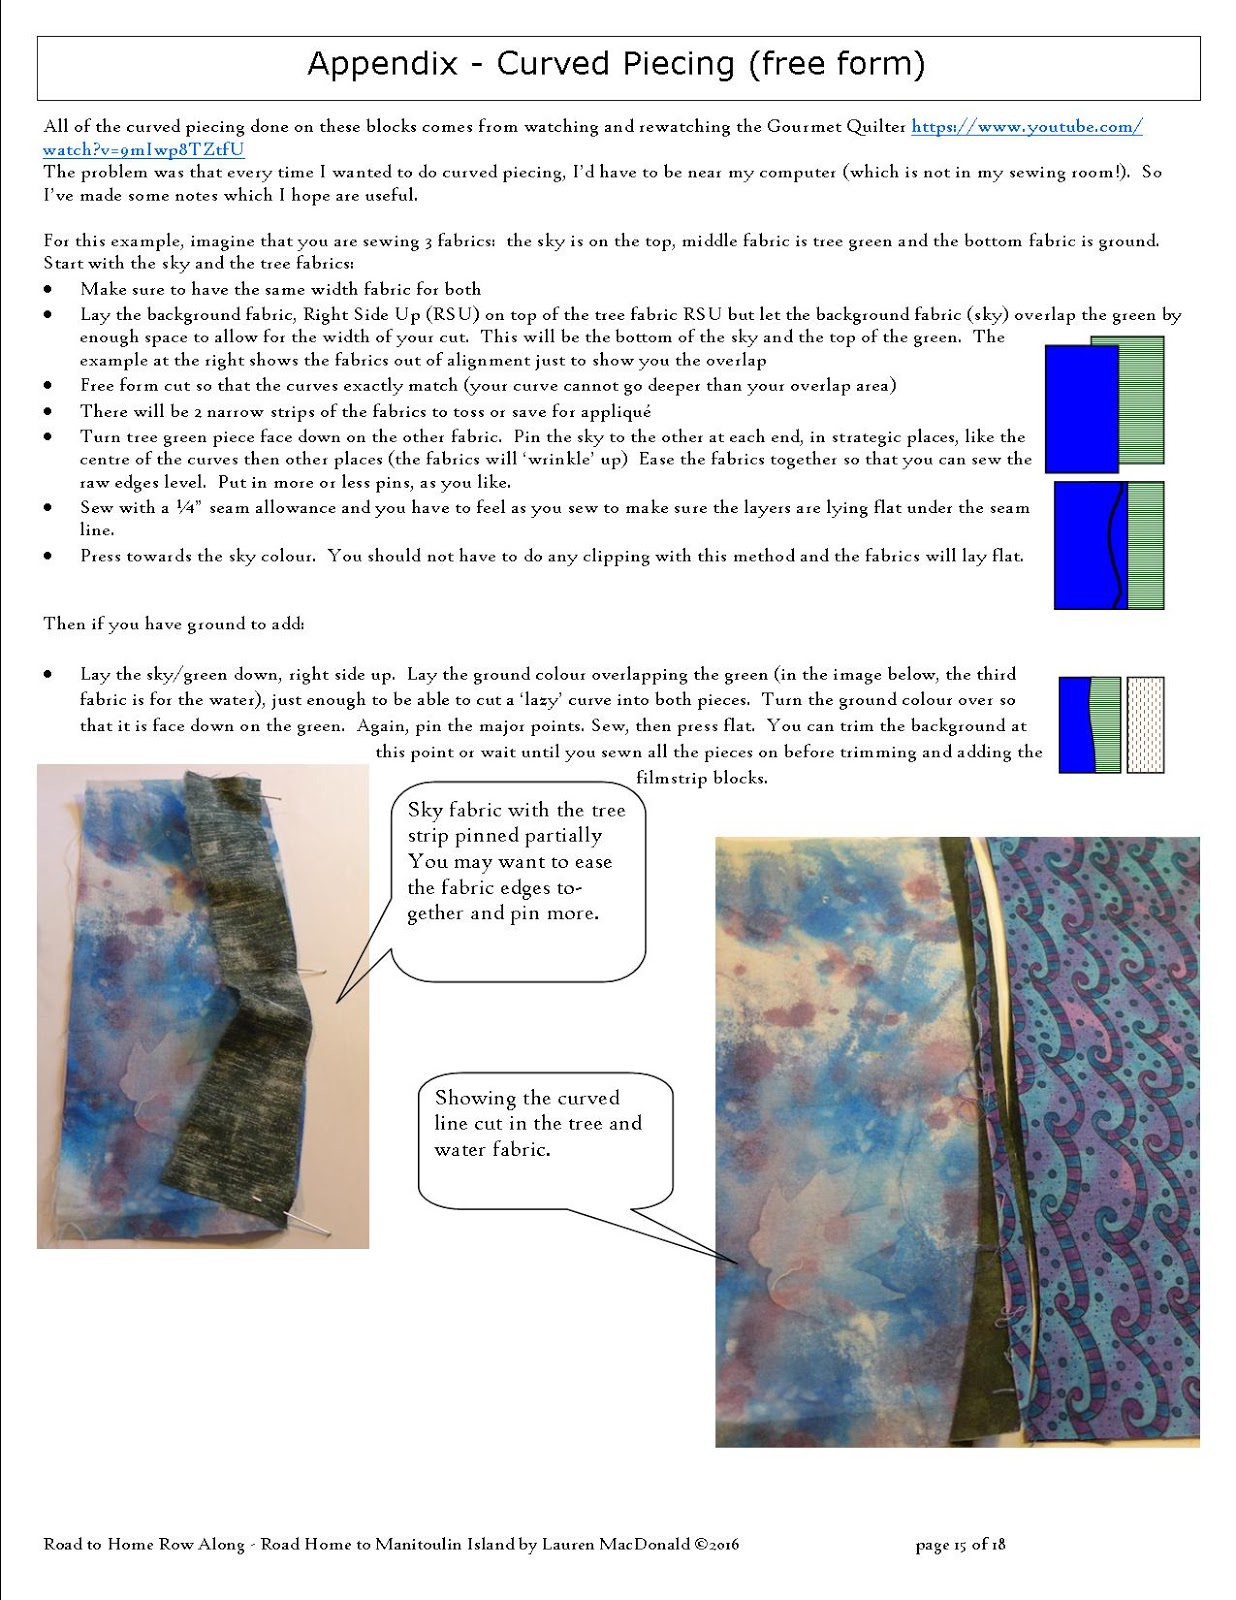
Life and Electric Quilt went off the list this month, except for fixing my Fall quilt!
We had a great workshop sponsored by our guild in October.  Although I don’t need more UFOs, I always enrol in guild workshops for 2 reasons:  to support the guild and to learn more – I find that I learn from the teacher and also from the other participants!  This one was a workshop by Marilyn Maki of Sault Ste. Marie (no link because she doesn’t have a website, but she does belong to the guild - www.saultquilts.com.  
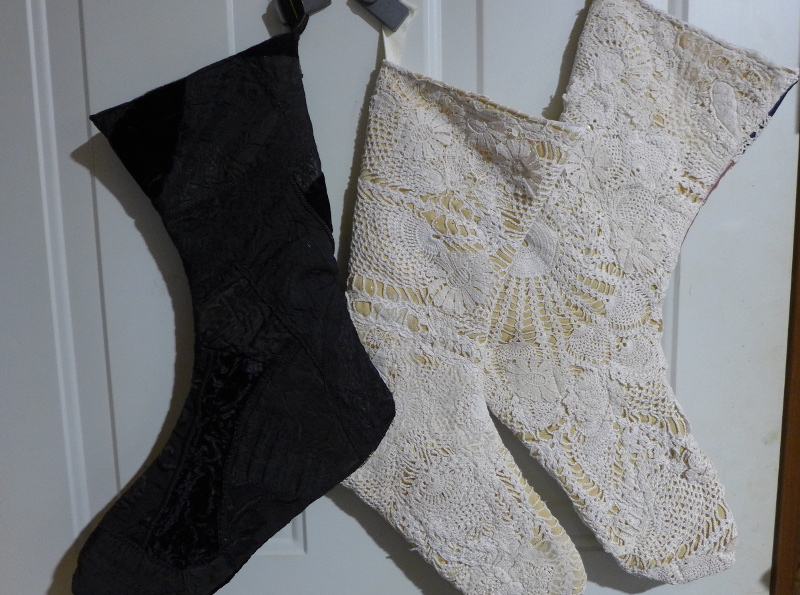
Here topic was crazy quilt stockings or pillow tops.  One of my oldest friends had given me lace, tatting and handkerchiefs from women in his family, so I took those to use to make a stocking for him as a family remembrance.
Once I got to the workshop, I found that Melissa McIntosh (our amazing longarmer  https://www.facebook.com/see.melissa.quilt/ ) had brought a large bin of fabrics given to us by Connie Wilson before she died).  Then our workshop leader, Marilyn, had also brought a plethora of ribbons, beads, amazing fabric to share!  Yes, to share, not sell!  How generous of her!  She also brought a friend, Susan Bailey, who showed the amazing crazy quilt blocks she is making with her family’s clothing.  One block even contains a piece of the suit her father wore when he married her mother. 


With Marilyn’s guidance, I worked on the stocking that has the navy and pink sections to it.  I had to coffee-dye some of the pink pieces, because I wanted to see a more ‘dusty’ version of the colour.  Although I seldom finish workshop pieces, I went home and finished sewing the stocking and started right away on the other side.   For the back side I decided to use the handkerchiefs Michael had given me and I folded them to fit.  It wasn’t until I completed the back that I realized that it had been so long since I had made a Christmas stocking that I hadn’t checked which side of the foundation to sew on!!!  Well…I had 2 fronts now. 
The backs of the stockings
 What to do?  Should I just use plain backs?  No!  I took a group of plain crocheted doilies and handkerchiefs and layered them on a large piece of gold fabric.  I placed tissue paper on top and then sewed all over it with invisible thread.  After I had secured all the pieces, I tore off the tissue paper and sew more carefully in some places.  I then cut out the backs.  For the black one I took apart 2 crazy quilted vests I didn’t wear anymore.  I used one for the front and one for the back and the lining of the vests for the lining for the stocking.
Now I have 3 stockings for my friends and enough to make another one!


Closer look at quilting


Next gifts:  I’ve been wanting to make more zippered pouches, so when I saw this tutorial:  https://weallsew.com/two-pocket-pencil-case/ I decided to make 2 for my nieces for Christmas.  I had coloured pencils and pens for them, along with some black leather and zippers.  I embroidered the front with their initials (S and SJ), then sewed them together.  I also had to watch a YouTube video, because I wasn’t sure from the tutorial how to sew it together, but I think they look alright – what do you think?  At one of the local Christmas market, I bought a bit of jewelry to use as zipper pulls.  Then this week I watched Man Sewing with a boxy pouch, so I’m going to make that one now!!  https://mansewing.com/2018/06/boxed-zipper-pouch/  I’m not saying I’m over being afraid of putting in zippers, but I feel a little more comfortable now.

Oh...and a couple of mugrugs for my grandson's study area - Of course I'll have to explain what a 'mugrug' is.  He studied piano for years and I make him a quilt with a piano key design for 2 borders, so I had some sections left over.
a few more reusable gift tags - vinyl pockets on the backs
 
Thanks for visiting!